Questions? Comments? Suggestions or Ideas? Contact me at:
cynspiration [at] gmail [dot] com

Monday, February 28, 2011

Let's Talk Patterns

eyelet-dress
image source saraicat
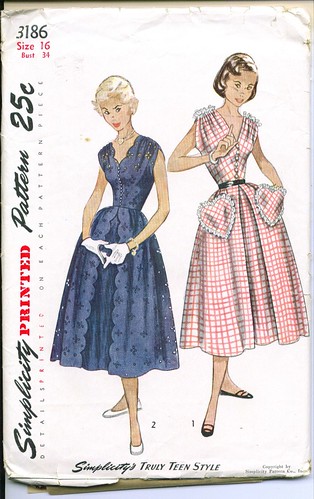
Those who sew know how much easier having a pattern makes sewing, whether it is one you make or one you buy. It seems to me that within the realm of craft and sewing blogs, purchasing a pattern from a Conventional source(i.e. McCalls, Simplicity, etc.) is really looked down on. I think that attitude regarding patterns does a disservice to Beginners.

I think that before sending people out to make their own patterns, beginners should first be taught how to understand and follow directions, and a good place to learn that is from a pattern.  After successfully tracing out your clothes, how will you know the order it was pieced together, or by what method to use when sewing on the sleeves? Using patterns when learning is a great way to learn many different techniques and the method and order that is used when sewing clothing. 

VOGUE DRESS Sewing Pattern
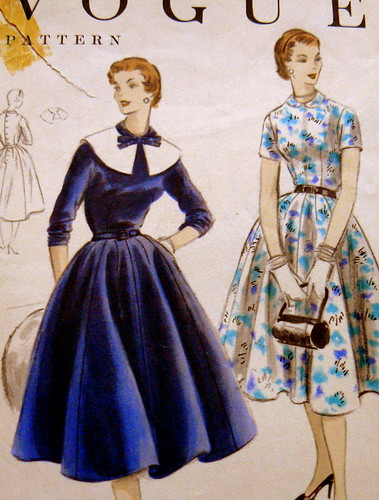
image source danagraves
Would you send someone with no cooking experience into the kitchen and have them, by taste, reconstruct the Hostess' salsa? The idea sounds absurd! So why the assumption that sewing is different? To teach someone how to cook, you first teach them how to read and follow a recipe, to understand each ingredient,  later to change/modify the recipe, and finally to create their own. 

simplicity knit top 4020 back
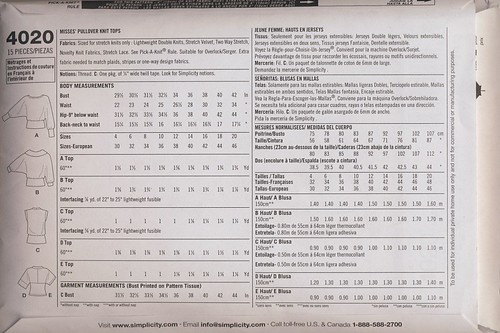
image source carbonated
Look at the back of this pattern with me, it is very detailed, and includes measurements, materials, correct sizing, and that black bar at the top will help pick the right fabric, with the right amount of stretch. Those are things that one will not learn by deconstructing an article of clothing, and then trying to replicate it.

Using a purchased pattern has some benefits to new sewers that they would not have by making their own. Each pattern includes a directions packet, that includes pattern placement on your fabric, acknowledges seam allowances, and has a glossary of terms that describe what some key words will mean through out the pattern. Each pattern piece has directional marking so that they are cut correctly with the grain of the fabric, not understanding this idea could be responsible for ruing a garment.

After learning how to follow a pattern, and recognizing the steps involved in clothing assembly, I encourage beginners to then try modifying the pattern. Make a change that changes the look of the garment, this will require tracing your pattern, and drawing the changes in so that you can cut your fabric correctly, or maybe you want to change a few steps, after understanding construction and sewing, you will begin to recognize where changes can easily be made. 

Photobucket
The Bowser costume I made, started with a pattern for a Turtle that I modified, altered, and changed to meet my needs. There was a lot of pattern making involved for the accessories, the tail, spikes and horns. But using the pattern for the body suit saved me time, because I didn't have to make my own pattern. The finished product barely resembles the pattern example, but it made things smoother for me. 

After you feel comfortable sewing with a pattern, and changing a pattern, then go ahead and construct your own, by tracing existing clothes or starting from scratch. Making your own pattern can be fun and exciting, but best done after the basics are mastered and understood.

Sign up for the mailing lists for your local fabric store before buying patterns, Hancock's and JoAnn's frequently put patterns on sale for $1.99. This would be a great time to find a simple pattern you want to learn with.

Our next lesson will be reading the direction sheet. 

Thursday, February 24, 2011

I GOT A NEW TOY!

Mr. Cyn must love me, because when I found a GREAT deal on a Silhouette last week...HE LET ME BUY IT! Actually he practically forced me to buy it because I have a real issue making purchases for myself.


So now, sitting beside my computer, waiting to be used, is a beautiful Silhouette. I have SO many projects planned, I can't wait to share them! If you want to know where I got my Silhouette and for how much (btw, less than the current Silhouette site sale...) send me an email.

In other news, Remember Susie? She posted a great upcycle? Susie launched her own website to really showcase the items she lists on Etsy. Be sure to check out Free Rose Studio.

Check back on Monday, we are going to discuss patterns, their pros, cons, uses, and benefits.

Monday, February 21, 2011

J's Birthday Party!

J turned 5 this month, and of course, that led to a celebration. 
Photobucket
All celebrations need a cake, with toys on top should the Birthday boy get bored.
Photobucket
With plenty of mini cupcakes, for the parents and adults to enjoy.
Photobucket
Thank you Goodie bags for the kids, 
Photobucket
Filled with crayons and cars...
Photobucket

Photobucket
A special Birthday shirt for the Birthday boy, that he got to help make, notice the white paint splatters that I was NOT allowed to disguise?
Photobucket
Races were played to entertain the kids, with candy as prizes to fill the treat bags.
Photobucket
Even the baby wanted to play, though H's face may be my favorite part of this picture.
Photobucket
Happy Birthday was sung, as was Many More Birthdays (a family tradition sung to the tune of Happy Birthday)
Photobucket
And the candles were blown out One.by.one.
Photobucket

Happy Birthday J!!
Cake was made by me and a friend, after reading Makeit-Loveit's Make a Cake series and the crayon idea came from Homemade by Jill.

Wednesday, February 16, 2011

Valentine's Day Shirt Recap!

Photobucket
Remember when I posted  here about making the boys Vday shirts? I thought I would share the boys in all their masculine Valentine's shirt glory!
PhotobucketPhotobucket

I also posted about a little girl shirt I was making for a friend. I turned out great and the little R wore it so well, she looked wonderful in it! The finished front-
Photobucket

The finished back, and an up close of the little bird that covered my mistake.
PhotobucketPhotobucket

I really loved how easy these shirts came together, and I loved watching the boys wear them. 
***************
By the way, I am feeling pretty stoked right now considering I fixed my computer all by myself...finally. The issues seemed to never go away, but after spending two entire days working with it, the issues are resolved and the whole computer is updated. To reward myself, I bought me a Silhouette SD! Woot! I can't wait to get busy with it!

I also have a post in the works from J's birthday party. He looked a stud in his race car shirt and the cake was so fun to make. Check back for it!

Friday, February 4, 2011

Apron Model

Remember the Aprons and Chef Hats I made for Christmas for J and H? J was happy for the apron but has REFUSED to put the chef hat on. H on the other hand, behaves as if they were the greatest gift ever! He asks to wear them all the time, whether he is eating or helping cook. I can't resist his charm!

Photobucket

Doesn't this face make you smile? Can you see the food on his face? This was the post cooking picture and he did not want to wash his face first.  All his personality shining through this photo makes me so happy, I can hardly contain myself. So, what do you think? 

Photobucket

Thursday, February 3, 2011

Valentines day Shirts

Photobucket
Valentines Day is just around the corner, and it is a FAVORITE holiday around here. My Husband is a romantic and takes any chance he can get to be romantic. I decided the boys need to be Festive on this favorite day as well. Festive, but manly which can be tough to do for Valentines, with all the pink, lace, and hearts around. But I think we managed it. I picked out some sayings that I liked, that were lovey, but not over the top or feminine. The shirts are simple, but I love the way they turned out.

I bought the shirts at Walmart and they are just plain long sleeve tees. I used fabric paint and freezer paper to put my sayings on. Ready to do yours?

I printed off the computer the text I wanted, and then traced it on to freezer paper, with the shiny side down. I don't have a fancy craft cutting machine(despite my best efforts), so I get to do it by hand.
Photobucket
I get to cut it all out by hand too. And that fact essentially changed my plans. I wanted the back of the shirt to say "since 2009" for each of the kids with the year they were born. So it would say, "LOVED, since 2009" But I wanted the back lettering to be small and there was NO WAY I was going to try and cut it out with scissors. 
Photobucket
Position the freezer paper on to your pre-washed shirt with the sticky side down, and iron with no steam. This will seal the freezer paper to your shirt so the paint doesn't run.
Photobucket
Apply one coat of paint at a time, and allow to dry before giving a second coat. The black paint only needed one coat, but the white needed more. See my mistake at the top? I'll show you how I fixed that in a minute.
Photobucket
Once yourpaint is dry, remove the freezer paper. It peels up really easy, just take it slow.
Photobucket
Put a plain press cloth over your painted graphic, and iron again to seal the paint. Then You are Done! The shirt is ready to go and the best part is they are easy, fun, and look great!
Photobucket


Okay, remember my mistake? Some paint dripped right of my brush onto my shirt. I am making this one for a friend's little girl, who happens to be named Robin. I found a very plain image of a robin, shrunk it way down, traced and cut it out, ironed it down and once painted will effectively hide my mistake while looking totally intentional and awesome. Pictures of the finished shirt will be coming in the next few days along with a shot of H wearing his apron and chef hat that I made for Christmas.
Photobucket