Questions? Comments? Suggestions or Ideas? Contact me at:
cynspiration [at] gmail [dot] com

Tuesday, August 31, 2010

Julian and Co

A family that I know suffered something I fear beyond anything else, the Loss of a child. I thought about what I could do to try and ease a little of the suffering, and wanted to get a gift for them. I had friends from around the country who generously pulled together to help as well, and ended up with several very sweet and heartfelt gifts for this family. You can read all about their story here: The Sullenger Family

One person though, a business owner, acted out of the kindness of her heart and donated a necklace that she made. Tania from Julian and Company makes beautiful jewelry all about Love for Families. When I saw her jewelry the first time I fell in love and will be adding some pieces to my collection when I can, I am trying to convince my husband they are perfect anniversary gifts.

Photobucket

Photobucket


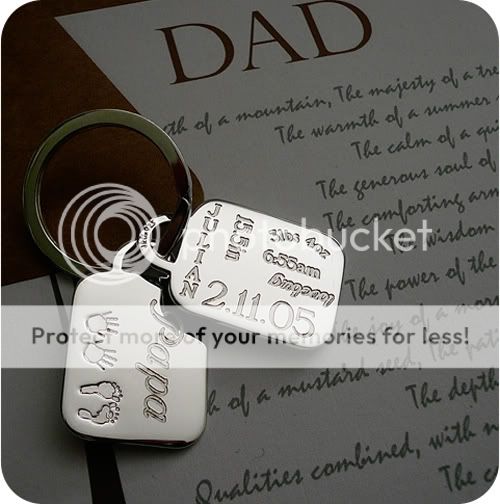
These are two of my favorite pieces, having three children I think the rectangle necklace would be easy to add to without getting overly bulky.  And I would love to have the key chain say Mommy instead.

Julian and CompanyAre you looking for some beautiful, hand stamped jewelry to celebrate your family? Please keep Tania and Julian and Co in mind.  Her button will always be easily located right from my sidebar.  Or you can follow from here, check out all the beautiful pieces she has to offer, there are even some for Grandma. These necklaces make perfect gifts and celebrate our families at the same time.

Friday, August 13, 2010

Ribbon Woobie

Much like a taggie blanket, but I feel the need to give it a nice unique name.

This one was small, a 5"x5" square, made with scraps. One side minky and one side flannel.  *NOTE: When sewing with Minky, I prefer to use a walking foot. A presser foot pulls the bottom layer faster than the top feeds and things don't always line up in the end while a walking foot pulls both layers*
Photobucket
I cut 4 inch lengths of various ribbons and pinned both raw edges along the raw edge the right side of my flannel square.  Use your basting stitch to sew them down.
Photobucket
With right sides together, sew the minky and flannel together leaving a small opening to turn right sides out, I left about 2 inches.
Photobucket
Clip corners.
Photobucket
Turn right sides out and top stitch all the way around. I also added some top stitching through the middle so that in case of washing the layers don't get disturbed. And that's it! 
Photobucket

Wednesday, August 11, 2010

Halloween 2010 Part 2

Costumes again. But this gets better and better. I'd like to introduce this years concept...

Do you recognize them?

My oldest wants to be SONIC THE HEDGEHOG!!!
His favorite color is BLUE and he believes himself to be the FASTEST runner ever. I am frequently told that NO ONE can run faster than him. Do you think Usein Bolt would let a 4 year old beat him???


His brother wants to be KNUCKLES

Because his favorite color is RED and 
he has to be like his brother! 


It makes sense then, if two kids match the third needs to follow the theme as well, So the baby at almost 1 year old will be TAILS! He doesn't have a favorite color yet, but his older brothers are pushing Yellow.


THE PLAN: 
Maybe I am optimistic, but I think these will be relatively easy costumes.  I intend to use a basic sleeper pattern for each child, but I will skip the ribbing around the neck and make a slight alteration that will put the zipper in the back. Each sleeper will be made from anti pill fleece (I am really hoping that Hancock Fabrics has a sale on fleece again this year, last year their sale saved me at least 50%!!) I will also not put feet on the sleepers, but will put ribbing around the ankles, this will allow tennis shoes to be worn and then covered to match the correct characters. Large gloves will be added to keep hands warm and finish off the look.

I will also make head pieces using the pattern base that I used for Bowser's head last year, with a few alterations and stuffing I should be able to achieve the right look for each of their heads. I have my work cut out for me!

I hope you are getting as excited for Halloween as I am!!

* I am still really hoping to have a Halloween Picture Parade of past costumes you all have made.  If you would like to participate, please email your submissions to me at cynspiration[at]gmail[dot]com.

Monday, August 9, 2010

Receiving Blanket Take One

I am a sucker for baby blankets. Seriously, I probably have 30 or more. When I see a cute flannel print and it's on sale, I find it hard to resist-in fact, I often don't.  Generally I do double sided flannel for my blankets, but recently dove into single piece blankets. Mr Chunk over here, still likes to be wrapped up to sleep and the summer is a little too warm for double sided flannel.  So, here we go!

Start by ironing 1/2 inch down on all four sides. They will over lap as shown. Then fold over another 1/2 inch to hide the unfinished edges and press. You want a good crease to be visible.
Photobucket
Open up the corners, you should be able to see the folds. *I marked mine with chalk so that it would be clearly visible here*
Photobucket
Trim the corner past the first crease, but not as deep as the second. It should look like this:
Photobucket
Fold over the corner about 1/2 inch and press
Photobucket

Then fold your edges down again, the first 1/2 inch, and press, then fold again and press well.
Photobucket
Your corners should look like this:
Photobucket
Pretty right? And it won't be really thick, in fact no thicker than the rest of your edges. Pin the corners well and a few places down the length of the seams.  On the wrong side finish off with a nice decorative stitch.
Photobucket
And use a different one to tack down the whole corner and you're done! So easy and Baby will love it!
Photobucket
Isn't that a nice looking corner? And the best part is, it took maybe an hour start to finish!

Stay tuned for several different takes on receiving blankets. Minky/flannel with binding and double sided flannel to come!

Friday, August 6, 2010

Boost My Blog Friday

BoostMyBlogFriday


I really want to get my ideas out there and share them, but I know hardly anyone knows about me yet, so here is my First attempt at networking...Hope you like it while you're here and check back throughout the week for tips on some easy baby gifts! For those seeing me for the first time you can read more about me and what I am all about here.

Thursday, August 5, 2010

How to Install a zipper!

I remember learning to sew and thinking that zippers were so Daunting, I was very concerned about putting one in and tried to avoid it like the plague.  But eventually, I put one in, and you know what? It's pretty easy!

Start by pinning the zipper onto your fabric, right sides together. Like this:
Photobucket
Using your zipper foot, sew down with a straight stitch very close to the actual zipper.
Photobucket
Fold the zipper under, and top stitch into place. I stitch about a 1/4 away from the fabric edge.
Photobucket
Stitching the other side down can get tricky, but with some maneuvering isn't too bad. I opened the zipper here, but you could leave it closed. Again, stitch close to the zipper.
Photobucket
Turn the zipper out, top stitch again, and you're done. Now open and close the zipper a few times and congratulate yourself! 
Photobucket
Viola! Finished!
Photobucket

Tuesday, August 3, 2010

The Shame

Sorry for the delay in posting, Things have been crazy around here and although I have been sewing, there hasn't been much time to sit at the computer and blog...I will correct this issue this week if you my readers can find it in your hearts to forgive me...stay tuned!