Questions? Comments? Suggestions or Ideas? Contact me at:
cynspiration [at] gmail [dot] com

Thursday, November 25, 2010

All the Silhouette Giveaways!

Remember this post where I talk about what I want for Christmas? Well, there are many, many blogs hosting Silhouette Giveaways RIGHT NOW! I am entering for my chance to win, but you should enter to! Here is a list of the links I have found so far! Good Luck, but I am hoping I win!


  1. MakeItandLoveIt
  2. HomemadebyJill
  3. Grosgrain
  4. TheIdeaRoom
  5. HowDoesShe
  6. WeAreThatFamily
  7. TaterTotsandJello
  8. ThriftyDecorChick
  9. NoBiggie
  10. Kara'sPartyIdeas
  11. InfarrantlyCreative
  12. The TomKat Studio
  13. LoveStitched
  14. MomsReview4you
  15. Shanty2chic
  16. ABeautifulMess
  17. OurBestBite
  18. BeDifferentActNormal
  19. CentsationalGirl
  20. ColiesKitchen
  21. DollarStoreCrafts
  22. House of Hepworths
  23. SewDangCute
  24. eighteen25
  25. LivingwithLindsay
  26. CraftGossip
  27. UCreate

Tuesday, November 23, 2010

What are your Holiday Dreams made of?

What is on your Wishlist this year? Mine is full of various books and small things, because lets face it, the MR heads into a Master's program later this year and we have 3 little boys. So Christmas for me is more about the boys. My wishlist doesn't get filled with expensive dreams. Just the small stuff. But I have a second SECRET wishlist. This is the one full of things that are OUT of the price range, but I want so bad it hurts!

There are only 2 things on this list(right now) and I know both are hopelessly out of reach, but I dream of them at night...

The Silhouette SD. WOW, what can I say, I think my crafting dreams would come true if this sat next to my computer. I can only envision all the wonderful things I could do with it. I made hats for the boys last night, J wants the bat symbol on his hat, and H wants Buzz Lightyear. How am I going to get Buzz Lightyear on a hat without buying a patch or spending hours appliquéing little pieces of fabric together? If I had the silhouette my problem would be solved. I would use the heat transfer and add it that way. I have to hold on to some hope that someday, SOMEDAY I will be able to open the door to see the UPS man handing me a package from The Silhouette company. Do you want one? Rumors around the blogosphere  tell of a special coupon code to get $100 off a special Silhouette package(okay, not rumors, they are valid! Head over to Crazy Coupon MommyMakeitLoveitHomemadebyJill. orThriftyDecorChick on Cyber Monday to get the special code or enter their giveaway for one before Sun night!). What an amazing steal! If only, If only!


The Second thing on my SECRET list is a bit more, okay a lot more expensive than the Silhouette (however, I consider it cost effective. You won't need to replace your machine in 5 years!) But it would make all my sewing dreams come true. I DREAM of the day when I don't hear the bobbin thread un-spooling because it came un-threaded mid-project, when I don't have to unpick a seam several times because my sewing machine  clogged, or the thread broke, or any of the other various problems my machine has. (These are not the result of user error. I can sew fine on my Mom's machine, which is NOT manufactured by the same company as mine.) Do you know what it is? Can you quess?

That's right, a BERNINA. Have you heard of them? Their machines are the ideal sewing machine out there, My Mom sewed on a used one for more than 20 years! That is a long life!! I can only dream of the beautiful Satin Stitching this machine could have given my Bowser Costume instead of the awful (good thing pictures don't give you a close up!) tugging that happened on my machine. I dream of the hum of this machine instead of the horrific sounds coming out of my machine(which sounds like death is knocking on it's door.) The machine pictured is the one on my list, the Aurora 450. It has 180 different stitch patterns and 4 alphabets. And it would last me years!! This one machine could see J and H into adulthood! And I see it in my dreams, every night it calls to me.

Now that you know my Secret Little Wish list, what is on yours?

(***This is not a paid advertisement and  was not requested by either company, just me spouting about what I want for Christmas this year-I would even count it as all my gifts for 2011, 2012, and 2013 too!!!***)

Monday, November 22, 2010

Easy Pants

Remember this outfit? I wanted a dark brown shirt/pant set but didn't want to spend time or money searching for the right outfit. So naturally, I decided to make it. I wanted to use knit so little C could be comfortable in his outfit, it was after all his first birthday and party. I ended up buying a dark brown 3XL Hanes t shirt from the folded shirts in the Men's section at Walmart. The shirt went far. It made one pair of 18 mos pants, one 18 mos long sleeve shirt, and the belt on his vest! I may buy more shirts just to use the knit for other projects. 

I started by finding a pair of pants that fit C. I laid out my freezer paper and folded the pants in half and made sure the seam was pulled out. See how I have them laid out and you can really see the shape of the pieces?

Photobucket
Next step: Trace, making sure to add a seam allowance, about 1/2 inch all the way around. Place pattern on your fabric and cut 4. (OPTION: You can also place this piece on a fold, just put the long, straight edge on the fold and do NOT incorporate a seam allowance on that side. Cut 2 on fold.) 
Photobucket
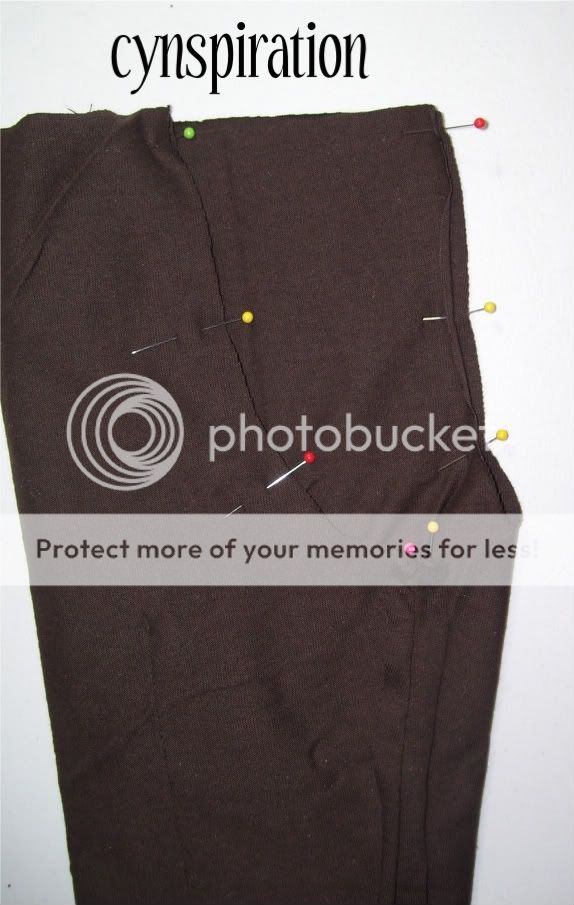
Pin and sew along the straight edge if you did not cut on the fold and pin and sew the inseam. Leave the curve open! Notice where my pins start, the open space will be where we connect the two pant legs together.
Photobucket
Turn one pant leg right side out and leave the other leg right side in. 
Photobucket
Put the right side out sleeve on to your arm like a sleeve with the bottom of the pant leg at your wrist.  Pull the second leg right over top of it.  Match seams, Pin. Sew. Pull leg out of pants inside. You should now have a pair of pants with all the seams on the outside. It really works. 
Photobucket
Hem the bottoms of each leg. Do this by folding one half inch, then a second half in. I like to press here, and then Sew.
Photobucket
Now make a casing for your elastic. Do this my folding the top of the pant in, larger than your elastic plus seam allowance. I used 3/4" elastic and folded my edge 1 1/4" down. Leave an opening so you can pull your elastic through. Notice the X. Sew.
Photobucket
Use a safety pin to pull your elastic through the whole pant. Then sew your elastic ends together, and close up the whole. I like to put a small piece of looped ribbon into the seam there to make it the back, and I like to run a stitch up the fabric along the original seam (not pictured, but leave a comment if you want one.) to secure the elastic and prevent twisting.
Photobucket
Turn right side out and you have some comfy new lounge pants! 
Photobucket

******A few Notes******
*Make sure to pre-wash your fabrics, to prevent shrinkage later.
*I also generally serge my edges, but was in a hurry on this day. Also knit doesn't unravel the way cotton and other fabrics do so it wasn't as big of an issue for me.
**Share some love and leave a comment so I know who you are! Also, stay tuned, I have a fun project in the  works and what I am making is headed to an online auction in support of a little boy who just had open heart surgery.

Monday, November 15, 2010

A Very Viking Birthday!

We call my third son Concobar. And he loves it. In fact, he is my only child to HAVE a nickname. No others stuck, and J is strongly opposed to nicknames. But the baby, he gets one. His Aunt refers to him as "Concobar the Barbarian!" and so for his first birthday theme, we ventured out of the Young ideas and went to Viking. He had a banner, a cake, and a GREAT costume.

Photobucket
I used a 3XL Hanes shirt from the Men's section at Walmart for his shirt and pants. Super easy(Tutorial is in the works!) The Vest I winged my way through with some fabric out of my Mom's left over pile and the belt was pieced together from the Hanes shirt. I love the bulky look of it! We had to put on the spats too, but instead of using Velcro, I used some Suede cord again to tie them on. I think it really completed the look. I then made a simple skull cap with a band  out of brown fleece(the vest was also lined with this) and added some stuffed horns. PERFECT!
Photobucket
Felt Banner attached to some Suede cord fund in the craft section at Walmart.
Photobucket
Fantastic Cake by Ashley from Ashley's Cakes by Design. Look her up if you are in her area!
Photobucket
I think the best part were the foam battle ax and mace!  He sure had a fun time picking on his brothers ATTACKING INVADERS!

*****************

Did you all see our Guest Spot last week? Check it out here!