Questions? Comments? Suggestions or Ideas? Contact me at:
cynspiration [at] gmail [dot] com
Showing posts with label beginners. Show all posts

Monday, February 28, 2011

Let's Talk Patterns

eyelet-dress
image source saraicat
Those who sew know how much easier having a pattern makes sewing, whether it is one you make or one you buy. It seems to me that within the realm of craft and sewing blogs, purchasing a pattern from a Conventional source(i.e. McCalls, Simplicity, etc.) is really looked down on. I think that attitude regarding patterns does a disservice to Beginners.

I think that before sending people out to make their own patterns, beginners should first be taught how to understand and follow directions, and a good place to learn that is from a pattern.  After successfully tracing out your clothes, how will you know the order it was pieced together, or by what method to use when sewing on the sleeves? Using patterns when learning is a great way to learn many different techniques and the method and order that is used when sewing clothing. 

VOGUE DRESS Sewing Pattern
image source danagraves
Would you send someone with no cooking experience into the kitchen and have them, by taste, reconstruct the Hostess' salsa? The idea sounds absurd! So why the assumption that sewing is different? To teach someone how to cook, you first teach them how to read and follow a recipe, to understand each ingredient,  later to change/modify the recipe, and finally to create their own. 

simplicity knit top 4020 back
image source carbonated
Look at the back of this pattern with me, it is very detailed, and includes measurements, materials, correct sizing, and that black bar at the top will help pick the right fabric, with the right amount of stretch. Those are things that one will not learn by deconstructing an article of clothing, and then trying to replicate it.

Using a purchased pattern has some benefits to new sewers that they would not have by making their own. Each pattern includes a directions packet, that includes pattern placement on your fabric, acknowledges seam allowances, and has a glossary of terms that describe what some key words will mean through out the pattern. Each pattern piece has directional marking so that they are cut correctly with the grain of the fabric, not understanding this idea could be responsible for ruing a garment.

After learning how to follow a pattern, and recognizing the steps involved in clothing assembly, I encourage beginners to then try modifying the pattern. Make a change that changes the look of the garment, this will require tracing your pattern, and drawing the changes in so that you can cut your fabric correctly, or maybe you want to change a few steps, after understanding construction and sewing, you will begin to recognize where changes can easily be made. 

Photobucket
The Bowser costume I made, started with a pattern for a Turtle that I modified, altered, and changed to meet my needs. There was a lot of pattern making involved for the accessories, the tail, spikes and horns. But using the pattern for the body suit saved me time, because I didn't have to make my own pattern. The finished product barely resembles the pattern example, but it made things smoother for me. 

After you feel comfortable sewing with a pattern, and changing a pattern, then go ahead and construct your own, by tracing existing clothes or starting from scratch. Making your own pattern can be fun and exciting, but best done after the basics are mastered and understood.

Sign up for the mailing lists for your local fabric store before buying patterns, Hancock's and JoAnn's frequently put patterns on sale for $1.99. This would be a great time to find a simple pattern you want to learn with.

Our next lesson will be reading the direction sheet. 

Wednesday, February 16, 2011

Valentine's Day Shirt Recap!

Photobucket
Remember when I posted  here about making the boys Vday shirts? I thought I would share the boys in all their masculine Valentine's shirt glory!
PhotobucketPhotobucket

I also posted about a little girl shirt I was making for a friend. I turned out great and the little R wore it so well, she looked wonderful in it! The finished front-
Photobucket

The finished back, and an up close of the little bird that covered my mistake.
PhotobucketPhotobucket

I really loved how easy these shirts came together, and I loved watching the boys wear them. 
***************
By the way, I am feeling pretty stoked right now considering I fixed my computer all by myself...finally. The issues seemed to never go away, but after spending two entire days working with it, the issues are resolved and the whole computer is updated. To reward myself, I bought me a Silhouette SD! Woot! I can't wait to get busy with it!

I also have a post in the works from J's birthday party. He looked a stud in his race car shirt and the cake was so fun to make. Check back for it!

Thursday, February 3, 2011

Valentines day Shirts

Photobucket
Valentines Day is just around the corner, and it is a FAVORITE holiday around here. My Husband is a romantic and takes any chance he can get to be romantic. I decided the boys need to be Festive on this favorite day as well. Festive, but manly which can be tough to do for Valentines, with all the pink, lace, and hearts around. But I think we managed it. I picked out some sayings that I liked, that were lovey, but not over the top or feminine. The shirts are simple, but I love the way they turned out.

I bought the shirts at Walmart and they are just plain long sleeve tees. I used fabric paint and freezer paper to put my sayings on. Ready to do yours?

I printed off the computer the text I wanted, and then traced it on to freezer paper, with the shiny side down. I don't have a fancy craft cutting machine(despite my best efforts), so I get to do it by hand.
Photobucket
I get to cut it all out by hand too. And that fact essentially changed my plans. I wanted the back of the shirt to say "since 2009" for each of the kids with the year they were born. So it would say, "LOVED, since 2009" But I wanted the back lettering to be small and there was NO WAY I was going to try and cut it out with scissors. 
Photobucket
Position the freezer paper on to your pre-washed shirt with the sticky side down, and iron with no steam. This will seal the freezer paper to your shirt so the paint doesn't run.
Photobucket
Apply one coat of paint at a time, and allow to dry before giving a second coat. The black paint only needed one coat, but the white needed more. See my mistake at the top? I'll show you how I fixed that in a minute.
Photobucket
Once yourpaint is dry, remove the freezer paper. It peels up really easy, just take it slow.
Photobucket
Put a plain press cloth over your painted graphic, and iron again to seal the paint. Then You are Done! The shirt is ready to go and the best part is they are easy, fun, and look great!
Photobucket


Okay, remember my mistake? Some paint dripped right of my brush onto my shirt. I am making this one for a friend's little girl, who happens to be named Robin. I found a very plain image of a robin, shrunk it way down, traced and cut it out, ironed it down and once painted will effectively hide my mistake while looking totally intentional and awesome. Pictures of the finished shirt will be coming in the next few days along with a shot of H wearing his apron and chef hat that I made for Christmas.
Photobucket

Friday, December 17, 2010

Credit Card Wallet

What a day it has been already! I seem to have 3 little boys who are unhappy-arguing and crying all morning, and the day isn't even half over yet! Here's hoping for a Mommy time out to rejuvenate my nerves. 
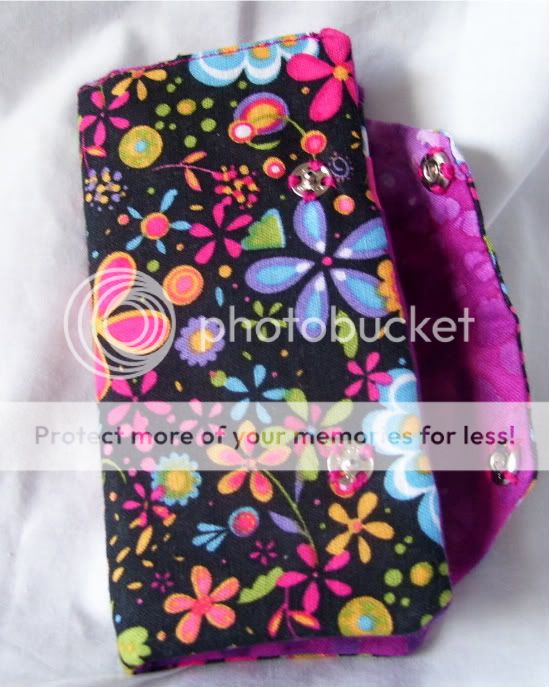
Last night I made a Credit Card wallet to match one of the key fobs I made. (Remember those? See them here.)

PhotobucketPhotobucket
I started with picking out two materials, one for the outside and one for the inside. I picked a third fabric for one small piece as well, to be one of the pockets. 

I started by making a freezer paper pattern. Here are the measurements: 
CUT 2 5 1/2 inch squares, one of each outside and inside fabrics
CUT one piece from three different fabrics 5 1.2 inches by 7 inches
CUT 2 5 inch squares from light weight fusible interfacing.
To make the flap, draw one edge 5 1/2 inch line and 2 inches away center a 3 1/2 inch line. Draw a diagonal line from each end point to make a trapezoid shape. See my pattern pieces below. CUT one from each outside and inside fabric. 
Photobucket
Using your iron, fuse your interfacing to the wrong side of each 5 1/2 inch square. It isn't pictured, but you should have a small edge without interfacing around the edge. 
Photobucket
With right sides together, sew your rectangles (7 by 5.5" pieces) into a tube, matching 5.5 inch ends. Just one seam along the bottom, leaving the ends open.
Photobucket
Turn right sides out and press.
Photobucket
We are now going to make the pockets for the cards. On the right side of the inside fabric, pin one of the rectangles with the fold towards the top. I figured out where to place the pocket by putting a gift card on top where I wanted it to fit and then placing the fabric 1/4 lower. Sew along the bottom. See the arrows? Start with the tallest pocket, and add to it so that the seams don't close off your pockets. 
Photobucket
Continue with the next two flaps, only sewing along the bottom edge, with folded edge towards the top.
Photobucket
Mark the middle and sew one seam down the center, so you will have two rows of pockets. 
Photobucket
With right sides together, sew around three sides of your flap leaving the longest edge open. Clip corners, and turn right side out. Press.
Photobucket
With your flap facing inside (as pictured) pin the raw edges along one side of the inside piece. Baste. Your pockets should be secured only by the seams along the bottom and the middle.
Photobucket
With right sides together, pin your outer fabric to the pocketed inside. With a 1/4 inch seam, sew around all four sides, leaving an opening above the pockets to turn. Clip corners.
Photobucket
Turn Right sides out, push out your corners, press and top stitch along the top edge only. Measure and mark where you want your snaps to be. I used sew on snaps.
Photobucket
Test your size, and be impressed with how well you did! 
Photobucket

Photobucket

Doesn't it look nice paired with a key fob? Who should I give this to for Christmas? It makes a great thoughtful gift. 
Photobucket

By the way,  I have some great posts coming up for next week-I will be making some things for the boys and I know you'll want to see them!

Thursday, December 16, 2010

Rice Heat Pack with cover!

I spend all winter Cold. Living in the mountains, as I do, I am subject to continuous cold weather. I love a nice heating pad. My problem with electric ones is that they are not safe in bed. So if I want to have my freezing cold toes on one, I have to be willing to get out of bed after I am all warm and toasty. See my dilemma? So today, I am making a RICE HEATING PACK. You will want to make one too, once you see how easy it is. 
Photobucket
Start by cutting out your fabric. You will need a lining and an outer bag fabric. I cut mine out each in one piece that was folded, but that is not necessary. The measurements:
Lining: CUT 2 11" by 7"
Bag: CUT 2 12" by 8"
Flap: CUT 2 12" by 4"
Photobucket
Start with the lining fabric. Because I cut one long piece of each I folded all my pieces in half. But I will instruct as if I had done it with two separate pieces of fabric-please imagine the last seam line.
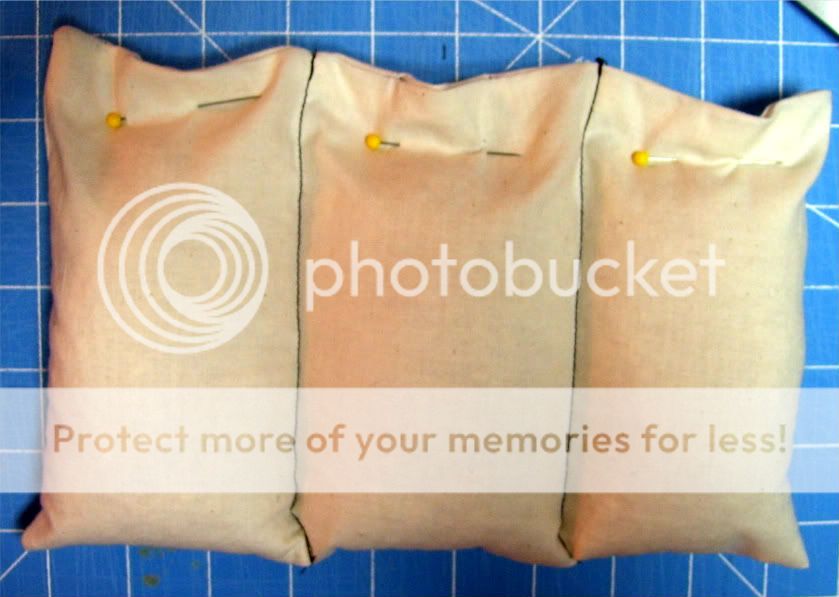
With right sides together, sew both short sides and one long side together. On the remaining side, start a seam, and then leave 3 openings along it. Backstitch at your start/stop points.  These openings are the beginnings of channels for the rice. The pins mark where I will put seams later. Clip corners and turn right side out through one of the openings at the top. Press.
Photobucket
Sew 2 straight seams down the width of your lining bag, one seam in between each of your openings.  It should look like this. Use a funnel and fill with rice.
***NOTE:The purpose of the channels is so that the rice is not able to pool at one end and leave one end cold.
Photobucket
Pin closed after filling and hand stitch each opening closed OR if you are daring, carefully top stitch closed. (I don't recommend this option. It is hard to maneuver and more than one needle has broken trying to come down on top of rice...) Your rice filled lining is done!
Photobucket
Next, the flap. Sew around two short edges and one long edge. You want your flap to look like this. Clip corners, turn, and press. After turning, I serged the unfinished edge. If you do not have a serger, press the raw edge inside 1/4 inch and baste the opening.
Photobucket
For the bag body, finish the top edge with a serger if possible or fold over 1/4 inch and sew down. Sew around 3 sides of the bag body, along both long edges, and the bottom open, you want your finished edge left open. Clip corners, and serge the remaining seams if possible. Turn and press.
Photobucket
Pin your flap to the back of your bag body, matching serged/finished edges. Sew down with a 1/4 inch seam. 
Photobucket
Open flap, and press seam down into the bag, and continue around the whole opening. Stitch down as close to the original edge as possible. So my stitch is 1/4 inch in.
Photobucket
Add velcro or buttons to keep your bag closed once your rice bag is inside.
Photobucket
I left my bag big(The measurements I provided won't be this roomy) on accident. I did adjust the pattern size here.
Photobucket
VARIATION: My boys love to have something warm on their feet too when they sleep, and in keeping with the color tradition, J and H both get a rice bag in their correct colors. I made their bags with a washcloth, and I followed the instructions for the rice bag, but skipped the outer decorative bag. Their little toes will be so toasty!
Photobucket
Finished! Doesn't it look great? My toes are cold as I write this and I am headed to warm it up now!

TO HEAT: Place rice bag with out decorative cover in the microwave. Microwave for 2 minutes, and then check your bag. If more time is needed flip over and set again. If you want your bag to be cold, place in ziploc bag first and put in your freezer for 30 minutes. Enjoy! This would also make a great gift for someone on your Holiday list, and it's quick and easy! What do you think?
Photobucket

Wednesday, December 15, 2010

Bean Bag Toss Bins!

Today's post is really an extension of yesterdays post. Yesterday we made bean bags and I mentioned that J wanted to practice throwing them into things, I knew that I needed to accompany the beanbags with some bins.
Photobucket
I stopped by Ace and picked up these plastic paint containers. I purchased three sizes, 5 quart, 2.5 quart, and 1 quart, for only $8. I like the difference in size because it will give the boys some variety. But I didn't like the look of all the Ace writing and mention of fill lines. 
Photobucket
I had a lot of fabric left over from the felt playhouse that I made(take a look if you haven't seen it, it is really cool!!), and decided it was time to use some of it. I measured the containers and trimmed the felt to size. Using a hot glue gun, I slowly wrapped the felt all the way around the container. I added a border and then a number.

The numbers are so that the kids can try for points. I want to point out that I intentionally gave the largest container the highest point value. I know it is normally done in reverse, but I was sensitive to the fact that my boys are young and I wanted to reward them for what they will be good at.
Photobucket
I am really happy with the way they turned out! What do you think? I can't wait to give this gift to the boys, I know they will be so excited!