In my little family, we don't have a lot of traditions yet, but we are working on it. We introduced a new tradition this year.
I was talking with J and H about why we celebrate Christmas, and said we were celebrating Jesus' birth day. Immediately J and H asked if he gets a cake? A birthday cake is necessary to the celebration they told me. And so yesterday, we baked a cake together, and put one candle on, for the first year we have done this, and sang Happy Birthday to Jesus. It was a very sweet thing for me to witness, that my sons wanted to celebrate His birthday.
But there is one tradition we have done every year since J was born, Christmas PJ's. That is my job for today, 3 pairs of pj pants, and a nice thermal shirt. Use this post to make your own easy pj pants. I am using fleece and won't be hemming them.
What are your Holiday Traditions?

Thursday, December 23, 2010

Wednesday, December 22, 2010
CHEF HAT!!
Remember yesterday when I showed you how to make an apron? Today we are learning to make the matching Chef Hat! I am so excited to see the boys in these, I think I am going to plan all sorts of meals for them to help me with.


CHEF HAT
You will need to measure your little guys head. J's head is 19" around. I am using elastic so I added three inches to the length. Cut one rectangle 22" by 6".
Start by making a circle pattern on freezer paper. I did mine by tracing a really big Tupperware lid and adding an inch all the way around-I was lucky I had a bowl big enough. I have also used two pens attached to a string to make a circle. Good Luck!
Now the difficult part. The circumference of your circle (distance around the outside) should be the head size plus 3" (22). This is the math part-I apologize for this.
To get the right circle size, first find the diameter (distance across) of your smaller circle. The formula is d=c/3.14. In my case, d=22 / 3.14. d = 7. I added my 8" for height. The diameter of the circle I need is 15".
I then drew my circle, folded it in half, and cut it in half along the fold.
Place your half circle on your fabric on the fold. I did not use the fold from the bolt, but made my own fold closer to the selvage edge. I did this to make the fabric more usable, and I didn't want a huge hole in the middle.
Now you should have one large rectangle (pictured folded) and one large circle.
For the band, fold your rectangle in half matching 6" sides, and sew with a half inch seam allowance.
Press the seam open.
Fold the band in half, matching the seams and raw edges, with right sides out.
Pin 3" away on either side of the seam to make a casing for the elastic. ***NOTE: When sewing and pinning, only get the back side of your band-it should still open like a circle! The pins should secure the wrong sides of the back of the band.
1.5" up from the bottom edge, sew a line parallel to the bottom edge. You now have a casing for elastic.
Cut a 3" piece of 1" elastic. Using a safety pin, thread your elastic through the casing. Stop when your elastic is pulled to the edge of the seam.
Pin your elastic, and use a zigzag stitch to secure it down. Continue pulling the elastic through the casing, and secure it the same way.
It will gather nicely for you and should look like this.
Now get your circle and use a basting stitch to gather. To gather, run a very long stitch around the whole circle, DO NOT BACKSTITCH.
Hold the top thread tightly and pull the bobbing thread, this will cause your fabric to gather. Push your gathers back and continue until your circle now has a gathered edge that is rougly 19" -or the circumference of your little guys head.
See what the gathers look like? The sides of the circle will now stand up.
Pin the circle inside the hat band matching raw edges. Sew together making sure to sew towards the inside of the hat from the gathered seam. This will ensure that your gather seam is hidden. I like to serge the edges here, if you don't have access to a serger, use a zig zag seam close to the raw edges to prevent fraying.
Viola! A Chef Hat!
Doesn't it look great? I am in LOVE with these aprons and think I may have to whip one up for the MR! He needs to match too, and considering he enjoys cooking and I endure it, it sounds like a plan to me!
What do you think? Do you have apron and chef hat making in your fute
Tuesday, December 21, 2010
LITTLE BOY APRONS!
My Little boys LOVE helping in the kitchen, and I have spent a considerable amount of time trying to wrap am adult sized apron around their little bodies. On Christmas Morning they will be opening a custom fit apron and chef hat. I can't wait to see how they like it!

The first step is measuring your child. The measurements you will need are:
Length from just bellow center collar bone to just below knee. Mine: 22"
Length from center collar bone to waist. Mine: 7"
Length across chest at armpit level. Mine: 7"
Waist. Mine: 14"
Length starting at armpit level on one side, around neck, and to armpit on other side. Mine: 16"

Length from center collar bone to waist. Mine: 7"
Length across chest at armpit level. Mine: 7"
Waist. Mine: 14"
Length starting at armpit level on one side, around neck, and to armpit on other side. Mine: 16"
Drawing your own pattern. Use Freezer paper and a ruler to draw your pattern.
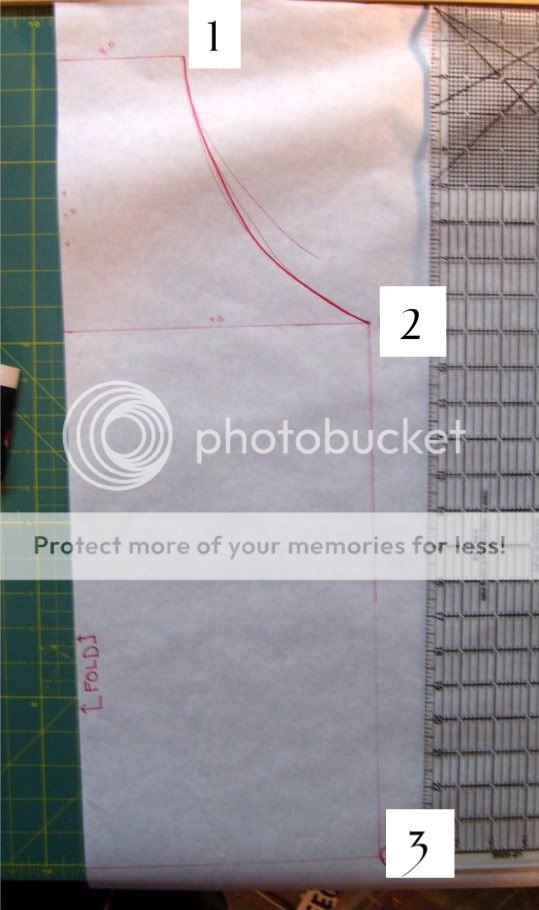
(1)At the top make a line that is half your chest across length. My line is 3.5".
(2)Using your ruler, draw your second line 7" down from the top line. Draw a parallel line that is half the waist length. My line is 7".
(3)Measure down from your top line the full length of the apron, in my case 22". Draw a third parallel line half the length of the waist. Another 7" line for me.
Last connect line 1 to line 2 with a sloping line. This will be done free hand, just go slowly until you have the shape that you want.
Cut one on the fold of your fabric. I used a lightweight denim because I know these are for little boys and I wanted durability. Cutting on the fold ensures that both sides match.
Prepare your pocket. Cut a strip of fabric on the grain that is 22" by 6". Press in half matching 6" ends.

Sew around all three open sides, leaving a small opening for turning. This will leave all your edges enclosed in your pocket. Clip corners, turn and press.

Cut two 14" by 2.5" strips that will become the ties, and one 18" by 2.5". Sew all three into tubes with ends closed and a small opening to turn them on the length. Look at the bottom tube to see where I put mine. Backstitch at all start/stop points.

Clip corners, turn right side out and press. Make sure to use a pencil and push the corners out so you have a nice clean corner.

Instead of finishing all the edges by turning, and pressing twice. I put a binding around the entire edge. After binding I pinned one tie to each side at the waist point and top stitched down. I pinned the neck band to the top and top stitched there as well. Instead of binding you can use bias tape as well. Need help binding? I am going to send you to Ashley at MakeitLoveit for help. I do finish mine a little differently, but my pictures are blurry so my own tutorial will have to wait.
Pin your pocket onto the right side of your fabric. Make sure the opening you left is on the bottom so it will be sewn closed. Sew around three edges, leaving the top of the pocket open. I sewed right at the edge, and then another stitch 1/8" next to it. Then in the middle of your pocket, sew two seams to divide the pocket into two pockets. I sewed then 1/4" apart.

And that is it! I am so excited for the boys to open these! Along with some measuring spoons, wooden spoons, and a safety potato peeler. (utensils purchased at the dollar store!)
Stop by tomorrow for the chef hat tutorial-You will be so happy to see how easy and fast it is!
Monday, December 20, 2010
Taking a break...today
I have a confession to make...I have only bough ONE thing for the kids so far this year. And today, MR and I will be out doing our shopping. I don't have a new project today, as I need supplies that will be purchased during our shopping adventure. I do have at least one more project for you this week, but I hope to keep this week simple and enjoy the Holidays with the kids. If you need some gift ideas, I have done some easy ones already this month.
I hope there are enough ideas to last you until tomorrow!! Are you finished with your Holiday Shopping?
Subscribe to:
Posts (Atom)