
I LOVE Snowmen at Christmas time and really all winter long. I don't know where this affinity came from, but I can't help myself. My Mom showed me some really cute stuffed pumpkins she made for Halloween this year, and I decided to use the same technique but make a snowman.

I cut three rectangles from White Sparkled Fabric. Sized as follows:
7" tall by 16" long
6" tall by 14" long
5" tall by 12" long
With Right sides together, sew one seem down the length, making a wide tube. Turn right sides out. Press the folds out of your fabric.

Using a running stitch, gather the bottom of your tube, along the length now. Pull it tight until closed, then secure and knot your thread.

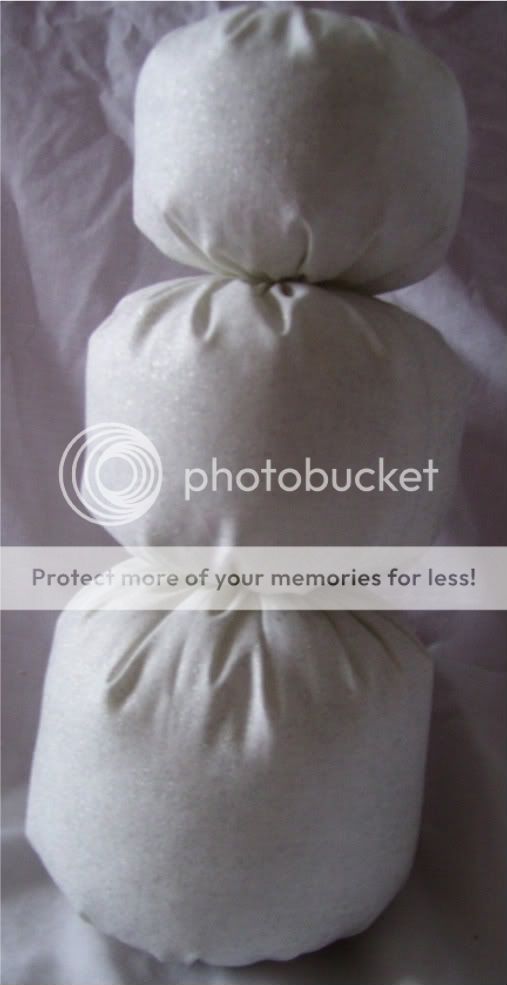
Stuff with Polyfill until your desired firmness is reached. And gather the top closed the same way you gathered the bottom.

It should look like this now. Repeat for all three pieces. **NOTE: For the largest tube you may want to put some rice in the bottom or some other method of weighting so your snowman will stand up.**

Stick a dowel into the small opening left from your gather to give the snowman a form.

Then hand stitch each ball together. Pull tight so your stitches are invisible.

Add buttons to the middle ball. I used three mismatched buttons.

For arms, I cut a small hole into the second ball on each side.

Fray check your cut so that it doesn't get ruined or frayed over time. Using Hot Glue, stick two small twigs into the openings. Be quick-the glue will dry very quickly so know how you want your arms positioned ahead of time.

I used scrap fleece from the boys' scarves to make a beanie type hat and a scarf for my guy. I didn't want the top hat look for him today, Because should the boys ever make a Snowman of their own outside, he will be beanied. I used some orange felt for a nose and black scraps for the eyes and mouth. All hand stitched after assembly.
After I was finished I realized that I had not weighted his bottom ball, and he kept tipping over, so I took the lid from an old sour cream container and hot glued his bottom right on for a base. It worked for me, but if you want a different look don't forget the weights!

I love this little guy, and I know I will have him around for years!So, what do you think? Is he a keeper?
4 comments:
I love this guy! I think he's so cute!!
I love it! The sparkle fabric is perfect!
I'm jealous! Seriously girl, you must be super woman, how do you find the time :) It's beautiful.
Absolutely adorable!!! And sooo easy, I think even I might be able to pull this one off! ;)
Post a Comment